

FitcamX 4K Dash Cam Review (2026): The Perfect OEM Look, But Is the Video Good?
If you have been using dash cams for years, you likely share a common frustration: the messy cables. Routing wires across the headliner, down the A-pillar, and sacrificing a 12V power port just to have a bulky camera hanging off your windshield is far from elegant. Plus, a visible dash cam can sometimes attract unwanted attention.
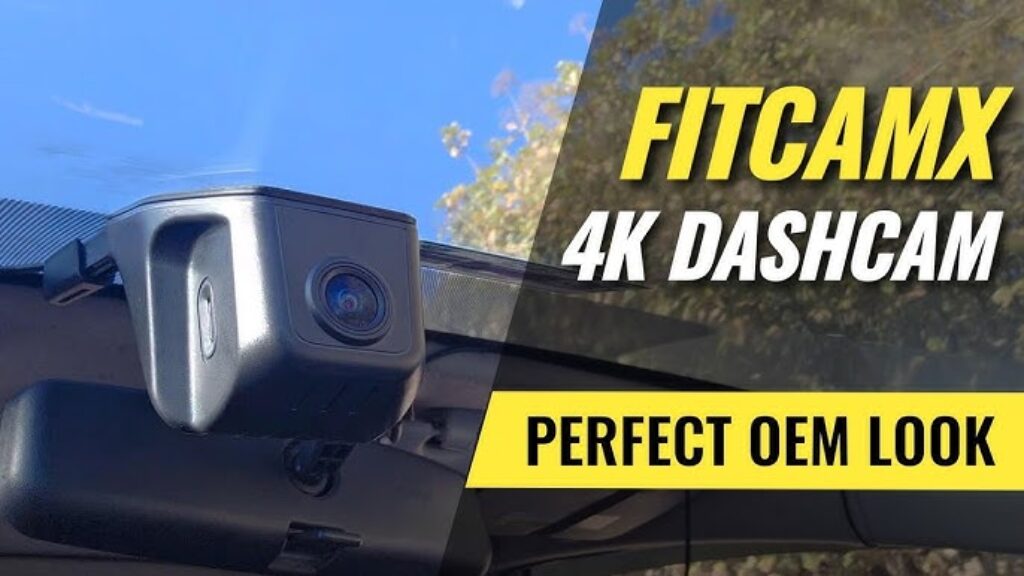
This is exactly why the FitcamX 4K Dash Cam caught my eye. Promising an entirely OEM (Original Equipment Manufacturer) look without running a single wire across the cabin, it sounds like the holy grail of dash cams.
But does this stealthy, integrated camera actually deliver on its 4K video promises? After rigorous daytime and nighttime testing, here is everything you need to know before buying.
What Makes FitcamX Different? (The Purchase Decision)
FitcamX does not use suction cups or adhesive mounts. Instead, they manufacture custom-molded sensor housings designed to perfectly replace the plastic shroud behind your rearview mirror. The camera integrates directly into this housing, making it virtually invisible from the outside.
Even better, it draws power directly from your vehicle’s existing overhead sensor systems (like Adaptive Cruise Control or Lane Assist). No fuse box tapping. No routing wires. ### Unboxing & Build Quality
- What’s inside: The main camera/housing unit, a pre-installed 64GB FitcamX-branded SD card, a proprietary power splitter, a trim removal tool, and a USB-A/C SD card reader.
- Build: The plastic feels incredibly solid, matching the texture and color of the factory shroud perfectly.
- The CPL Filter (Sold Separately): I highly recommend purchasing the optional CPL (Circular Polarizer) filter. It uses a rotating bezel to cut down harsh dashboard reflections on the windshield. It attaches via 3M tape, meaning installation is permanent, but the reduction in glare is worth it.
The 5-Minute Installation Process
Note: I installed this on a 2023 Toyota Corolla Hatch. FitcamX makes specific models for specific trims, so triple-check your vehicle’s compatibility before purchasing.
Installation is remarkably straightforward and requires zero wiring experience:
- Remove the OEM Shroud: Pop off the small rear panel, then slide the main factory shroud downward. It requires a firm tug.
- Transfer Fasteners: Gently move the colored retaining clips from your factory shroud to the new FitcamX housing.
- Plug and Play: Unplug the factory power connector from the car’s sensor array and plug in the FitcamX Y-splitter.
- Attach the Camera: Connect the camera’s barrel plug, slide the new housing up into place, and snap the rear panel shut.
The entire process takes roughly 5 minutes. Once installed, it is completely indistinguishable from a factory Toyota component.
App Setup & Usability
The camera boots up automatically when you start the car. You connect to it via the FitcamX App (iOS/Android) using the camera’s built-in Wi-Fi (Default password: 12345678).
The app is minimalist but functional. You can view a live feed (useful for tuning the CPL filter), adjust basic settings, and download clips.
- Limitation: The maximum recording loop is only 3 minutes, likely to manage the large 4K file sizes.
- Security Note: The camera’s Wi-Fi remains constantly active while driving. While hacking it on the highway is highly unlikely, a toggle to disable Wi-Fi would be a welcome addition.
(Tip: To retain more than 5 hours of footage, upgrade to a High-Endurance 128GB or 256GB MicroSD card from SanDisk or Samsung).
Video Quality Review: The Brutal Truth
This is where the FitcamX struggles. While it advertises “4K Resolution,” real-world performance reveals significant issues with image processing.
Daytime Performance
At a glance, on a bright, sunny day, the footage looks vibrant and pleasant. However, upon closer inspection:
- Over-processing: The camera applies aggressive edge sharpening. Tree branches and power lines suffer from severe “haloing,” creating a crunchy, unnatural look that masks true details.
- License Plates: If you are stopped directly behind a car, plates are readable. However, vehicles in adjacent lanes or further ahead quickly become unreadable blurs.
Nighttime Performance
Dash cams show their true colors at night, and the FitcamX unfortunately falls apart under low-light conditions:
- Stopped at a Light: You can read the plate directly in front of you, but illuminated street signs are completely blown out by light bloom.
- Highway Speeds: The image is overtaken by digital noise and motion blur. Reading license plates of moving vehicles at night is virtually impossible.
- Side Roads: In poorly lit areas, the footage devolves into heavy smearing, leaving no usable detail for accident reconstruction.
Note: I worked closely with FitcamX customer support (who were incredibly responsive) to test firmware updates and setting tweaks, but the underlying aggressive image processing could not be fixed.
Final Verdict: Should You Buy the FitcamX?
The Pros:
- Unmatched Stealth: The best OEM-style integration on the market.
- Effortless Install: True plug-and-play without routing any cables.
- Build Quality: Matches factory plastics perfectly.
The Cons:
- Video Quality: Heavy artificial sharpening ruins fine details.
- Night Vision: Poor low-light performance and motion blur.
- CPL Filter: Must be purchased separately.
Conclusion: The FitcamX is a polarized product. If your absolute top priority is a clean, wire-free, stealthy interior and you just need basic footage to prove who was at fault in a daytime fender-bender, the FitcamX is a brilliant design.
However, if your primary goal is capturing crisp, highly detailed 4K footage to read hit-and-run license plates at night, the sensor and image processing here simply do not hold up to traditional, premium dash cams.